Monday, August 8, 2011

Mini Album and a Layout

Hiya everyone.  Just a quick post today as I have a tonne of things to get done and just didn't want to leave it another day without posting as the weeks just fly by.

First up is a quick little mini I made for my youngest daughter.  It will be her 13th birthday soon and I just wanted her to have a special little album to put those pics in when her big day comes round.  I used the Bo Bunny Gabrielle collection and it is just loaded with all sorts of embellies and techniques.  I have made sure that there are plenty of pockets and tags for her to add whatever she wishes.


Next up is a layout of my favourite shoes!  Yes, you will wonder why these are my favs, and NO I have not lost it.  You see I have travelled quite a bit and lets just say that I am a rather adventurous person.  I have seen some pretty amazing things in my travels and if it were not for these shoes I don't think it would have been possible. 


To create this layout I used my Cricut Imagine to print the main page.  This was originally white card stock and once printed on the imagine it was just off white with the pale blue ruled lines.  I then used my trusty ol' distress ink pads in Walnut stain, brushed corduroy and black soot to just swipe across the page creating this rather cool weathered background..  I have used a multitude of stamps, die cuts and rubons as well as the 7 Gypsies fabric tape and Tim Holtz film strip which has been attached using Zutter rivets.
Well that's it for today better run and collect the girls from school.
Thanx for stopping by
Ciao for now X

Sunday, July 17, 2011

A little of what I have been up to

Hi Peeps.  Wow, it has been nearly a month since my last post.  Where has that time gone????
Although I haven't posted, I have been pretty busy.  We had school holidays for three weeks, which in and of itself, was a little bit of madness.  It is quite hard keeping teenage girls entertained.  We did get to do a few fantastic things.  One of them being Whale watching as it is the season right now here on the Gold Coast.  Our day was amazing! We got to see quite a few whales up close and personal  but I will only bore you with one pic (I did go a little overboard and had the camera on sports mode - so got way too many).  This whale was about 200 metres in front of us.


We also went to my favourite place (almost in the world) Max Brenners.  This place is just the best as I am a serious CHOCOHOLIC!!!  We did visit this place a couple of times......it was just way to hard to stay away!


As you can see we were very well behaved and shared a mixed chocolate fondue.


The Hot chocolates were to die for.  I think I preferred the Dark chocolate one though.

We also did lots of shopping, went bowling, visited with friends, had lots of friends stay over, went to the movies, we even went to the Drive in which was loads of fun.  I even made up goodie bags for all the girls (my girls had a couple of friends come with us) which got devoured in just minutes.  I thought that as it was holidays I would get lots of scrapping in but this clearly was not the case.  I did get a couple of things made so all in all a very exhausting few weeks.
One project I so enjoyed creating was my art journal.  I have been meaning to make one for quite some time now (I already have a couple but I have just used second hand novels from the op shop) so am very happy to get started on some pages. I have bound this book using the coptic stitch method then just used the Tim Holtz vintage hardware die to cut two hinges from plain grungeboard.  The cover is also out of Grungeboard.

I used soooooo many products and different techniques on the covers of this book that I would probably be here forever trying to explain, so I won't bore you with all the details.  The closure is a simple hair tie threaded through a hole in the back cover and you just loop it over the hitch fastener attached to the front cover.  I also used Zutter rivets to adhere the hinges to the front and back covers.
Here is a peek at a couple of other little things I made for my eldest daughters birthday coming up.  The first one is a cupcake to house a gift card or money.  I saw Jo from Paper Drama  make a cupcake gift box using the petals from I am roses so I thought this would be a great idea for my cupcake idea that I had.


The cupcake itself is made with a polystyrene foam ball cut in half then stuck back together at the sides and bottom only using dimensional foam to leave a gap so that you can put either money or a gift card in it.  I cannot take complete credit for this idea as I am sure I have seen it somewhere but just cannot remember who was the genius.  I then used two lengths of designer paper measuring 2.5 in x 12 in and scored them every 1/4 inch.  I then stuck them together and then  glued it to a mat to form the cupcake wrapper.  The polystyrene ball was then stuck into the wrapper using hot glue.  I then stuck all the petals over the ball to cover the top and decorated with embellies.  I am really happy with the way it turned out.  I am sure she will just love it as well.
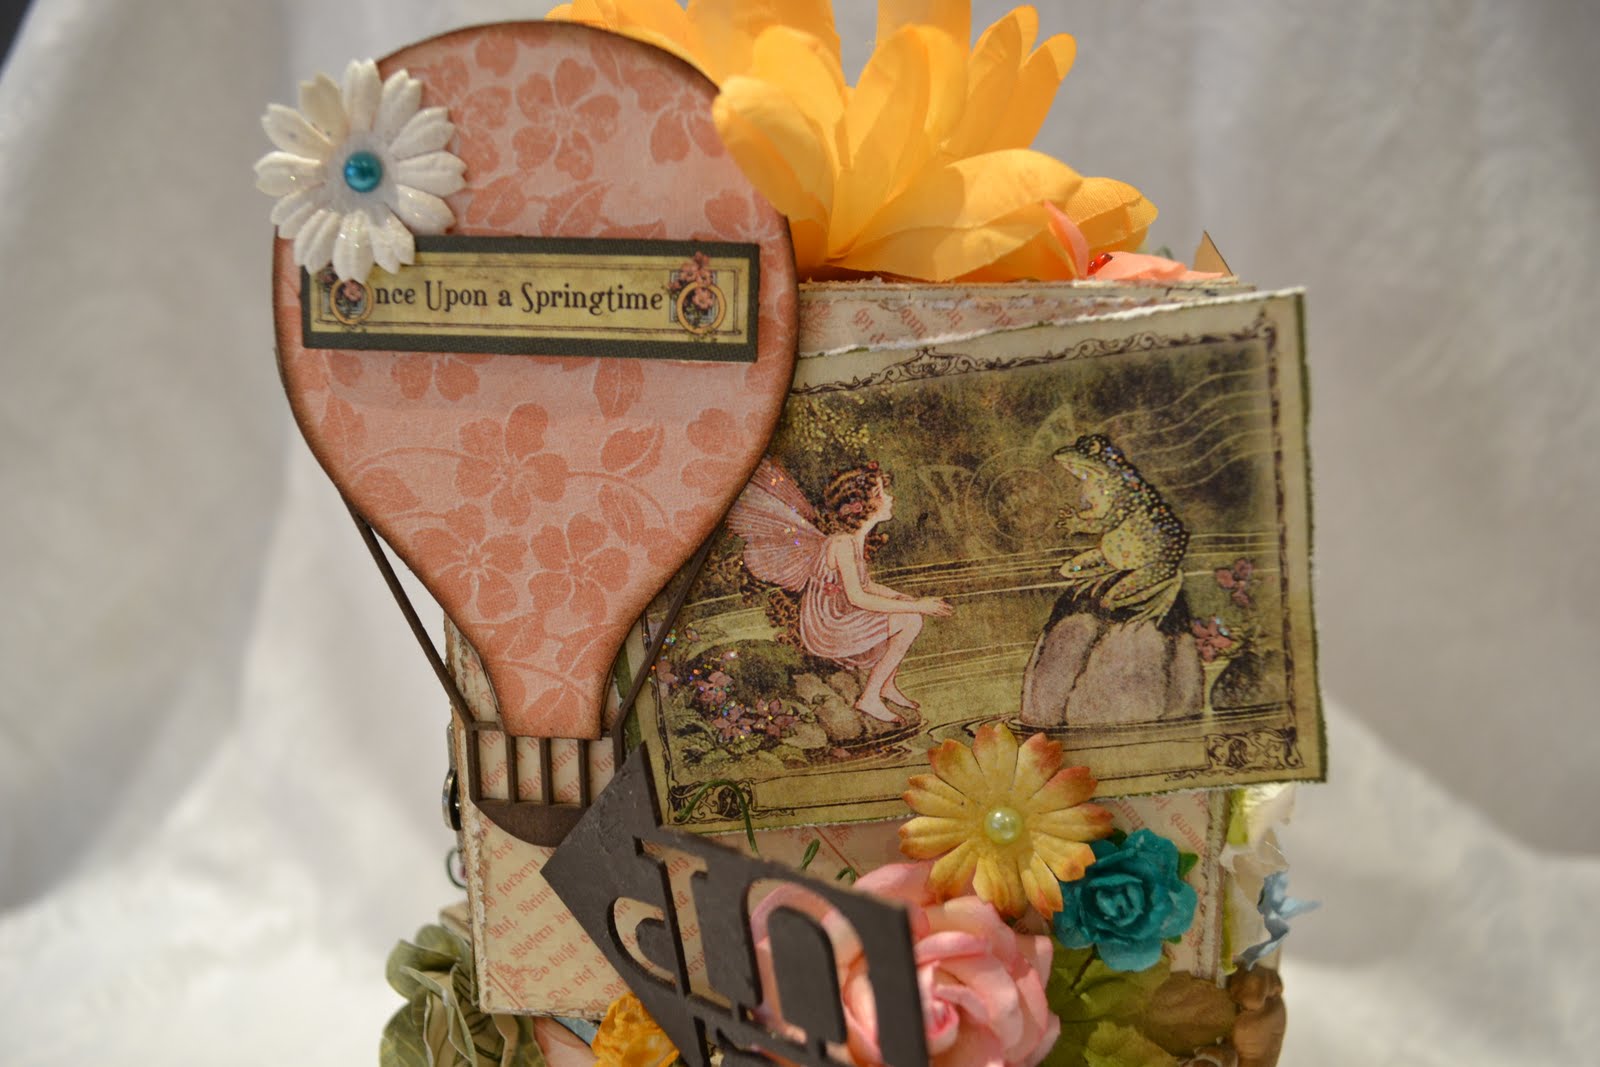
 This next creation is actually a gift box/card.  This is such a nifty idea but did take a little time to create but worth the effort.


I will probably stuff this one with some little bits of jewellery as she is really into that lately.

Well that's it for today. Thanx for stopping by and if you have any questions  about any of the projects in today's post please just email me  on the address listed in the right hand column.
Ciao for now. xx


Thursday, June 23, 2011

Copic Storage

Hi everyone. Hope you have all had a fab week.  With the winter chill setting in I find myself inside quite a bit trying to stay warm.  We are certainly having a REAL feel of winter this year (we don't normally have very cold weather on the Gold Coast).  So this being the case I am organising my little studio to have things more "close at hand".  My copics was starting to do my head in so I came up with this wonderful idea and just had to convince my other half to help me with bringing it all together.  As all of you know, storage can become quite expensive, so I wanted something to accommodate my current collection and allow room for additional purchases, without braking the bank.  So here is my fantastic solution.

Poly pipe from the hardware store!


I just purchased a couple of the shorter lengths (easier to manage) and cut into lengths of 15cm using a drop saw. I then sanded all the rough edges (using the drop saw left hardly any at all) then used liquid nails to glue the pieces together.  I can always add on at a later time if need be. Obviously the size poly pipe is that which would be suitable as a down pipe.
As you can see it accommodates a lot of markers and doesn't take up much room on your desk.  I was absolutely rapt with the end result and who would have thought it would cost sooooo little.  So if your thinking of storage solutions for your crafting schtuffff it is well worth just looking around your home for ideas outside of the box.
Well that's it for today. Hope you enjoyed my storage idea and thanx for stopping by.
Ciao for now
Kaz x

Thursday, June 16, 2011

I have been published!!!!!!

Hi peeps.  Sorry it has been a couple of weeks since the last post but I have been a little busy with lots of little things.  Over the Queens Birthday long weekend I helped Jane Tregenza of Seriously scrapbooking  (and founder of the wonderful "Imaginarium Designs") with her stand at the Papercraft fair held in Brisbane.  It was a very busy weekend.  We actually sold out of a lot of things on the first day! Can you believe it??Both Jane and Nat's classes proved to be a big hit with all classes booked out.  If you haven't visited the Imaginarium Designs website yet you had better check it out soon as they have some pretty amazing chipboard products.

On another note I have been published!!!!!!  I actually found out a little while ago that two of my card creations were going to be published in the debut magazine for Whimsy Stamps but I had to keep it a secret until now.  My creations are on page 49.   Below is a close up of both the cards.


Well that's it for today.  Hope you enjoy having a look at the new mag. 

Until next time ciao for now. X


Tuesday, May 31, 2011

Off the page creation featuring Imaginarium Designs

Hello blog visitors.  As promised, here are some pics of an off the page creation I made using some more of the fabulous Imaginarium Designs products.


The cubes are from the Kaisercraft timber collection.  I just painted them in burnt umber then used a crackle medium.  After this dried I applied a liberal coat of cream paint and voila, a beautiful crackle effect.  Just love the way it came up.


All the papers used are from the Graphic 45 Once upon a springtime collection  (one of my favs).  All chipboard pieces are from Imaginarium Designs and flowers are predominantly from I am Roses.


And here is a little notebook with chipboard from Imaginarium Designs mini's collection.


Well that's it for today.  Thanks for stopping by and be sure to pop back again soon.


Ciao for now.  xx

Wednesday, May 11, 2011

Projects featuring Imaginarium Designs

Two posts in one day!!!!!  Yes I am on a roll.  A little while ago I mentioned in one of my posts that I took a little break to McLaren Vale, just outside of Adelaide and visited the very talented Jane Tregenza of Seriously Scrapbooking ( HERE is the website for the shop) and  founder of Imaginarium Designs.  To see the range of products available just click HERE. Whilst I was there I got some of the wonderful goodies from  Imaginarium Designs to create some project with  and have finally finished most of them.  I am just putting the finishing touches onto an altered item and as soon as that is finished I will put it up on the blog.


The first project is a layout of my favourite pic of my girls.  As they are now teenagers these beautiful moments of "sisterly love" are few and far between to capture on film, so when I do I treasure them!  On this layout I have used a few yummy Imaginarium chippies.  The main one is the frame which I have painted black acrylic paint.


I used a set of the butterflies in two different sizes and coloured them using pearlescent inks.  I then bent their wings slightly to give the impression of flight.  The word Dream is also Imaginarium alpha' s. The background I have stamped using the Darkroom Door script stamp and just  sprayed two different colours of glimmer mist over the whole page then distressed the edges.


This next image shows one of the butterflies up close as well as a set of the flourish accents from the Imaginarium range.  Not sure of the name of the pack but you can go to the Imaginarium website linked above to see.


The big blue flower I made using my spellbinders scalloped circles in various sizes and cut out several pieces of white tissue then covered them in glimmer mists.  I then put them together with a brad them crumpled them up around the brad.  Once all the layers were crumpled enough I gently unravelled them to reveal this beautiful creation.  I think it turned out OK.


All the other flowers, petals and leaves are from I am Roses.

The next project is a mini album I made using the Bo Bunny Timepiece collection.  LOVE IT.  I also used the Noteworthy Journaling pack as well numerous other products.  The imaginarium Designs chippies just make any project come together soooooo darn fast and they are super easy to work with.  Throughout this mini I used all different mediums on them and they just came up a treat.


The little flourish on the left hand page below is actually part of a 12 inch border flourish which I dissected and used it throughout the album.  So versatile.


 The flourishes below are part of the mini's collection.


  The following two pics are of the rest of the 12 inch border flourish I cut up.


If you would like to see more of Imaginarium Designs chippies in use you really need to check out the Graphic 45 blog (as well as the Imaginarium blog).  Jane is on the Graphic 45 Design team and some of the other designers often feature these chippies in their projects.  Jane and her talented team will also have a stand at the Brisbane Scrapbook and Papercraft Fair this June long weekend (June 11-13) so if your in or around the area it is worth going to check out the whole range in person and maybe even purchase a couple.

Well that's it for this little chicken today.  Off to do some real work.  Remember to check back soon for the altered item using the chippies,

Ciao for now. x